
SIMPLE SHORTCUTS & SECRETS
Photo Editing Made Easy
For busy wedding & portrait photographers so you can close that laptop sooner.
Easily Refine Generative AI Selection With One Button
Coming to you from my pink keyboard is a little trick I found that makes refining your selection when using the generative AI in Lightroom easy peasy! And it makes my nerdy little heart happy when I use it. 🤓

So you know when you’re making a selection with the generative AI eraser tool (we need a better term for that thing, agree?) and the red selection is over areas of the photo that you don’t really want to include.
While you could go all the waaaaay over to the side panel to choose the “subtract” brush to clean up your selection edges there’s an EASIER way! Lemme show ya:
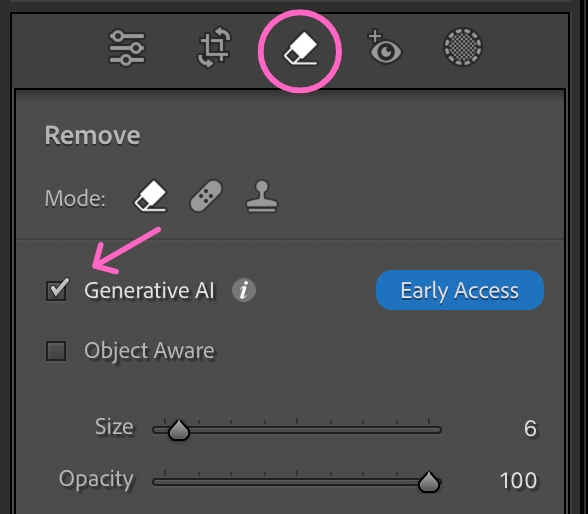
Step 1
Activate the eraser tool by tapping Q on your keyboard. Select the eraser and make sure the “generative AI” box is ticked.
Step 2
Make a selection over the thing you want to take out from the image.
Step 3
Hold down the OPTION key (or ALT key on PC) to change the brush into the subtraction brush so you can clean up any of the edges you don’t want the generative AI to change. You can tell it’s the subtraction brush because you’ll see a - instead of a + in the middle of the brush.

Ah! Oh my gosh, this is super easy and makes refining a selection so much better too!
Go try it out the next time you’re in Lightroom. It’s kinda fun! And totally okay to enjoy it. 😄
Happy editing,
Erika

Check Out the Newest Posts
Hey there photographer!

I'm Erika. I'm a private photo editor for wedding photographers and photo editing educator. Think of me as your techy friend who loves figuring out the shortcuts in Lightroom Classic so you don't have to.


Blog Categories


(Affiliate Code)


Online private photo editor based in Cleveland, Tennessee, serving wedding photographers worldwide.
Services
Color Correction
Style Matching
Lightroom Classic Retouching
Image Culling

Copyright © 2020-2026 Erika Swafford. All Rights Reserved
Created with Systeme.io